1-Check the error which user receive while he is logging, (remember this error can be catched later from the event viewer).
Remember to scroll down the error to get the details!!!
The error which you could fine gonna be something like:
*Access is denied
*There is not enough space on the disk.
*The specified network name is no longer available.
*Windows cannot find the local profile and is logging you on with a temporary profile. Changes you make to this profile will be lost when you log off.
There is another errors from userenv, related to roaming profile, but its out of our focus for now.
-I think they are clear enough, but based on each one we will apply a different troubleshooting steps.
If you couldn't read the error from the logon error, its not a big deal, you have to open event viewer and go to Application folder and search for errors from userenv
The error will contain the description of the error as mentioned earlier:
You can apply filter in Application folder to see the userenv errors only.
Now lets discuss each problem and how we can try to fix it:
Access is denied
1-We have a roaming profiles, on a server where a file screen policy applied, which prevent copying media files to the server, so if a user moved a media file to his or her profile then tried to logoff, it will receive this error, cause server cannot synchronize its profile, cause of the blocked file type.
Solution: delete the local copy of the user profile (from documents and settings on user workstation)
2-If the problem still exist, logon to the server take the ownership of the user profile, give yourself full access permission, then give the ownership back to the user(Without giving the ownership back to the roaming profile and all of its sub folders to the user he will not be able to login and he will receive access denied error) then delete the unwanted files from it.
There is not enough space on the disk.
In this case you have to free up some space in user workstation,
there is a neat tool from microsoft named delprof you can download it from here
This tool need to computer name and it will do the rest of the job for you, it will delete all cached profile to free up diskspace, then user can log on.
The specified network name is no longer available.
Seems like a cable problem or server was down, in this case if you beleive that server is up and running and the workstation is connected, so you have to reboot the machine and try again, if problem exist try to ping the server where the roaming profile exist, to make sure its up and running.
Windows cannot find the local profile and is logging you on with a temporary profile. Changes you make to this profile will be lost when you log off.
1-Delete the local profile if exist.
2-Delete the tmp profile.
3-logon to the server, take the ownership of the user profile, give yourself full access permission, then give the ownership back to the user(Without giving the ownership back to the roaming profile and all of its sub folders to the user he will not be able to login and he will receive access denied error) then delete the unwanted files from it.
Without giving the ownership back to the roaming profile and all of its sub folders to the user he will not be able to login and he will receive access denied error)
My blog focus mainly on Computing specially administration and scripting, i focus as well on breeding lovebirds, and life and wisdom :).
Sunday, July 20, 2008
Tuesday, April 22, 2008
How to import users to Active Directory using csvde
Sometimes you need to add many users to your domain, something like this could be time consuming, so today i would like to show you how to import users from an excel sheet, will first of all we have to prepare our users excel sheet, our excel sheet, i gonna attach an example file,
Download the example file from here
you can simply modify the first example and fill the sheet excel with your users, then you have to save the file as csv (comma-separated values)
Now after we finished preparing our sheet, we have to import it to the Active directory, we will use cvsde command (this file doesn't exist in Windows XP if you want to use it copy it from windows\system32\ of Windows 2003 to windows\system32\ of Windows XP
now the command syntax will be like this:
cvsvde -i -f D:\Example.csv -j F:\
-i stand for import mode (the default is export)
-f stand for file (its need the full path to the csv file
-j Stand for logging (you have to specify the path of log)
If you are running this command from Windows XP so you have to add -s servername
so the syntax will be like this:
cvsvde -i -f D:\Example.csv -s servername
you have to give a special attention to DN field, here you can identify where the user gonna be exist in which OU
for instance if i want to add a user named Ahmed in an OU named Accts so the DN field will look like this:
cn=Ahmed,ou=Accts,dc=MyDomain,dc=net
I hope that you find it useful, see you soon :-)
Sunday, January 13, 2008
How to take an image for your server or your workstations
I am going to show you how you can take an image for your servers or your workstations, i am going to use Acronis True image server, but you can use any other imaging tools and getting similar solution, first lets talk about servers, ill assume we have a Domain controller running Windows 2003, so we will install the Acronis true image server, which is a straight forward installation, you will need to reboot your server after you finish your installation, then we are ready,
Then we will choose our system partition usually its gonna be C: (again i have to remind you with the earlier warning)
WARNING:I Assume here that the domain controller sysvol and NETLOGON are installed on there default place on C:\ otherwise you will need to backup them too..
Then we have to choose where Acronis gonna save the image, we have to choose any partition expect the one which we are imaging!, personally i use my E:\ cause its usually have enough space for image.
Then we have to decide weather it gonna be a full backup or a differential one, for Server or workstation imaging in all cases it have to be a full backup, any full and differential backup ideas gonna mean more headache and more downtime, so we will go with full backup.
Now we have an option to change some options for the backup like splitting the archive to fit on CDs or some other media, but again i don't recommend doing that in our situation so we don't have to edit any of these options for now, lets just use the default options...
Finally Acronis show you a list of operations which it gonna perform to confirm it, so simply check it and when you are ready click on proceed
After clicking on Proceed Acronis gonna start on taking image and there is no need to any other interaction from you, so just wait till its finish, time gonna vary based on your server specs and your server load, and your partition size.
Now we got Acronis image for our system, the image have extension tib which stand for true image backup, and we can use the option of validate backup archive to re check any image before rely on it.
I also recommend naming the image to the name of the server and the date of the backup to make it easier to find the image, but the more important point now, how i have to restore this image,well we will make a bootable CD for acronis using Create rescue bootable media option on Acronis
And we will use this cd to boot from in case we got a server failure and browse to the image which saved on hard disk and restore it, but what if the server hard disk has been totally damaged and the image itself had been wiped ?!, in this case some could recommend copy the image to another hard disk so if the failure attacked the hard disk you can use this hard disk to restore the image from, well it gonna work, but i gonna recommend something else for you, while its not the best solution i find working fine.
Acronis rescue disk creation give you an option to save an ISO file instead of burning direct to a CD, so we will let Acronis create this ISO file,
then we will edit this file using any iso editing tools, in this tutorial i am going to use UltraISO,
and click on actions and choose add files, then browse for the acronis backup which you created earlier for your server and choose add
, now just save the ISO file
now you have an iso file for the bootable rescue disk with the server image, you can simply burn it, mostly you have to burn it on a DvD cause it will exceed any CD size, so burn it on a DvD and next time you need to restore your server even in a harddisk failure case you will just need to an external DVD R and this DVD media,
hmmm how about if i got my server specs changed what if my server had been burnt and i bought and you bought a new server with another hardware specification?!, mostly restoring an image for another hardware will need to follow it with Windows Repair cause hardware drivers changes gonna make windows crash on its first start up on the new machine, so how can you get rid of that ?!
or by other meaning:
How can you create a Generic Image you can restore on any machine ?!
Simply we have to make our server drivers generic enough so restoring it to another server become possible,
so simply before taking the image from your server
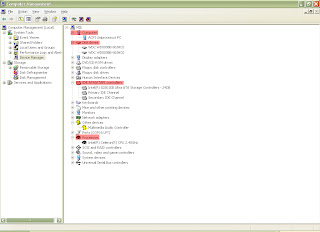
go to device manager and update these four drivers to the standard drivers:
Make them looks like this:
You have to put these items back to there standard drive (without rebooting)
Computer: make it standard PC
Disk drive: make it Disk
Processor: make it processor
IDE ATA controllers: make them Standard Dual channel PCI IDE controller
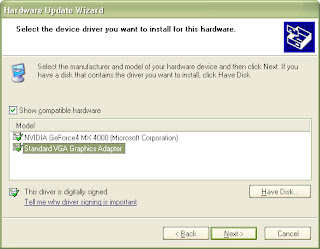
In case you changed the Standard VGA driver to something else you better update it back to standard
WARNING:I Assume here that the domain controller sysvol and NETLOGON are installed on there default place on C:\ otherwise you will need to backup them too..
We will start by open Acronis true image server:We will choose the first option which is for imaging the whole of the hard disk or a specified partition.
Then we will choose our system partition usually its gonna be C: (again i have to remind you with the earlier warning)
WARNING:I Assume here that the domain controller sysvol and NETLOGON are installed on there default place on C:\ otherwise you will need to backup them too..
Then we have to choose where Acronis gonna save the image, we have to choose any partition expect the one which we are imaging!, personally i use my E:\ cause its usually have enough space for image.
Then we have to decide weather it gonna be a full backup or a differential one, for Server or workstation imaging in all cases it have to be a full backup, any full and differential backup ideas gonna mean more headache and more downtime, so we will go with full backup.
Now we have an option to change some options for the backup like splitting the archive to fit on CDs or some other media, but again i don't recommend doing that in our situation so we don't have to edit any of these options for now, lets just use the default options...
Finally Acronis show you a list of operations which it gonna perform to confirm it, so simply check it and when you are ready click on proceed
After clicking on Proceed Acronis gonna start on taking image and there is no need to any other interaction from you, so just wait till its finish, time gonna vary based on your server specs and your server load, and your partition size.
Now we got Acronis image for our system, the image have extension tib which stand for true image backup, and we can use the option of validate backup archive to re check any image before rely on it.
I also recommend naming the image to the name of the server and the date of the backup to make it easier to find the image, but the more important point now, how i have to restore this image,well we will make a bootable CD for acronis using Create rescue bootable media option on Acronis
And we will use this cd to boot from in case we got a server failure and browse to the image which saved on hard disk and restore it, but what if the server hard disk has been totally damaged and the image itself had been wiped ?!, in this case some could recommend copy the image to another hard disk so if the failure attacked the hard disk you can use this hard disk to restore the image from, well it gonna work, but i gonna recommend something else for you, while its not the best solution i find working fine.
Acronis rescue disk creation give you an option to save an ISO file instead of burning direct to a CD, so we will let Acronis create this ISO file,
then we will edit this file using any iso editing tools, in this tutorial i am going to use UltraISO,
- We have to open the rescue media iso file which we created using Acronis earlier, we have to open it in UltraISO
and click on actions and choose add files, then browse for the acronis backup which you created earlier for your server and choose add
, now just save the ISO file
now you have an iso file for the bootable rescue disk with the server image, you can simply burn it, mostly you have to burn it on a DvD cause it will exceed any CD size, so burn it on a DvD and next time you need to restore your server even in a harddisk failure case you will just need to an external DVD R and this DVD media,
hmmm how about if i got my server specs changed what if my server had been burnt and i bought and you bought a new server with another hardware specification?!, mostly restoring an image for another hardware will need to follow it with Windows Repair cause hardware drivers changes gonna make windows crash on its first start up on the new machine, so how can you get rid of that ?!
or by other meaning:
How can you create a Generic Image you can restore on any machine ?!
Simply we have to make our server drivers generic enough so restoring it to another server become possible,
so simply before taking the image from your server
go to device manager and update these four drivers to the standard drivers:
Make them looks like this:
You have to put these items back to there standard drive (without rebooting)
Computer: make it standard PC
Disk drive: make it Disk
Processor: make it processor
IDE ATA controllers: make them Standard Dual channel PCI IDE controller
In case you changed the Standard VGA driver to something else you better update it back to standard
Now before any restart you have to take an image for your server following the earlier steps
after Acronis finish creating the image, you can use it to restore Windows on any machine no matter what is the specs of the machine.
Subscribe to:
Posts (Atom)
لعرض عدد الهارد ديسك المتصل بالكمبيوتر: #!/bin/bash foo=$(lsblk | grep -c ^sd*) final=$[$foo-1] printf '%b\n' "You have...
-
Sometimes you need to add many users to your domain, something like this could be time consuming, so today i would like to show you how to i...
-
هذا سكريبت لأضافة اعدادات الشبكة لكارت النتورك (يستعمل السكريبت امر nmcli) #!/bin/bash #xp2600@gmail.com which nmcli if [ $? -eq 1 ]...
-
لعرض عدد الهارد ديسك المتصل بالكمبيوتر: #!/bin/bash foo=$(lsblk | grep -c ^sd*) final=$[$foo-1] printf '%b\n' "You have...